Description
Considerations in getting Quarto websites and Codeberg to play nicely
Introduction
It is New Year’s Eve, and it is snowing here in Toronto, so I would rather be inside writing this.
One of the things Quarto can produce is a static website (meaning, it turns your content into a website that a user can look at but not interact with). This is ideal for websites for courses or workshops, where the idea is to provide material for your students to work with, or (at least in part) for a blog, where the idea is to share your ideas with the world. (In a blog, you might want to enable comments, but that is another story that we do not get into here.) A standard way to share these with the world was to use Github Pages, where you set your website up as a Github repo, and then configured the Pages part of Settings, and got a URL that would display the site.
There are, these days, good reasons not to use Github. There are other places to host your code that are not owned by big corporations (Microsoft, in the case of Github) and are not in the US. Some of these are based on Forgejo, such as codeberg.org, hosted in Germany, and worktree.ca, hosted in Canada. I use both of these two. You can also host Forgejo yourself. These all still use Git, so you can handle a lot of things the same way you are used to (commit, push, pull, etc).
One thing that Github Pages has going for it is that the mechanism is fairly simple, and Quarto has a “publish gh-pages” that will handle most of the details for you. Codeberg has its own equivalent, Codeberg Pages, that works a bit differently. The website you want to publish has to be two things:
- on a branch called
pages - in the root folder of the repo.
I have a couple of ways of making this work, which may not be elegant, but they appear to work. The elegance, I leave to others.
In part 2, I discuss how you can use your own domain with all of this.
Website and source in the same place
This is about the least aesthetic way to do it: have your .qmd files and the .html files produced from them in the same folder. This means that when you open up your website project in R Studio or wherever, you will see your .html files mixed in amongst your source. If you are prepared to put up with this, I think this is the easiest way to go.
When you create a Quarto website, you get a file called _quarto.yml in which lives the design of your website. Here is the top of one of mine:
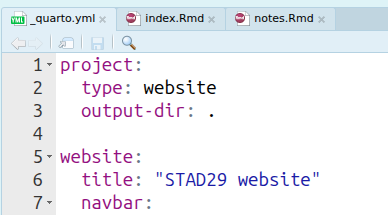
The key thing is the output-dir: . — this means to build the website in the same folder as your .qmd files with your content. This solves the second Codeberg Pages bullet point above: it doesn’t matter that there are other files in with the .html ones, because the .html files are the ones that will be shown on your website.
The other thing is that first bullet point: “on a branch called pages”. Branches in git used to scare me, because the discussion of them you would find online tended also to get mixed up with “pull requests” and dealing with other people working on a project, neither of which are likely to apply to you working solo on a website. I discovered that you can have just one branch called pages and work on it all the time.
If you have used Happy Git with R, the mechanism you start with on Codeberg is like the one in “existing project, Github first” (Chapter 16 there). On Codeberg, you have to create a repo there first, and only then put stuff in it, even if you have a project in R Studio that maybe already has been attached to git.
So, log into Codeberg, and create a new repository by clicking on the + sign top right and then New Repository. When you do that and give it a name, you’ll be greeted by this:1
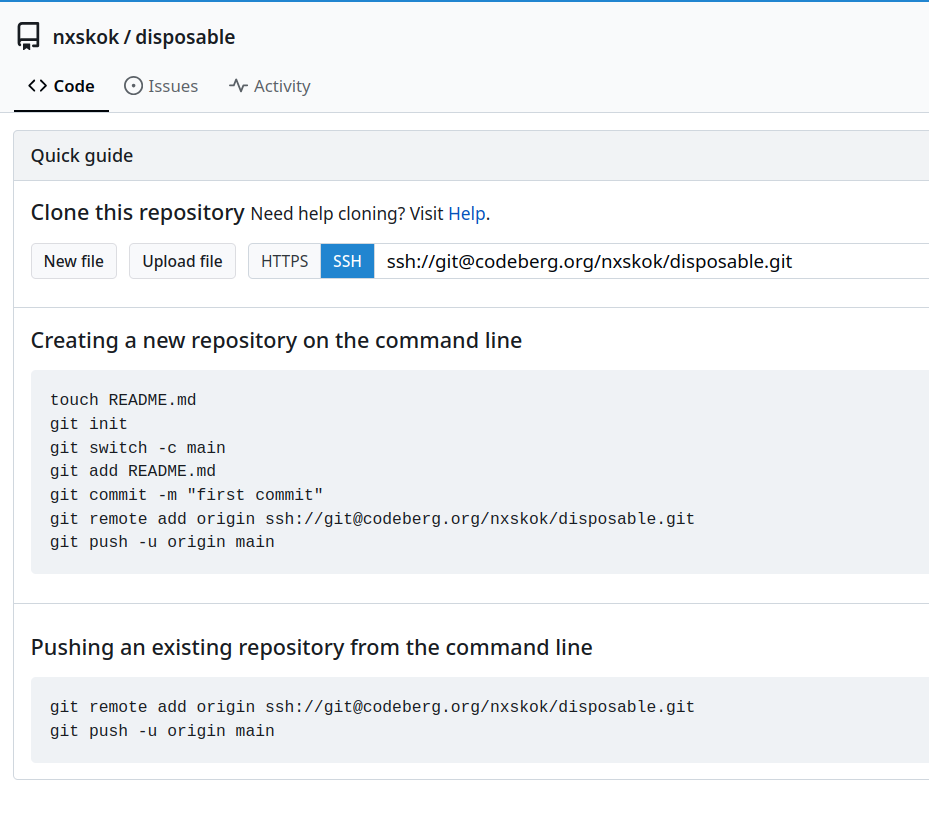
These are your instructions for attaching your R Studio website to Codeberg. I find the SSH approach easier, so this is that (see Happy Git with R, chapters 9 and 10, for discussion of SSH vs HTTPS). Click the button to see the other one. However, we are going to set up a pages branch right away, so what you need to do is replace each instance of main in these instructions with pages. If your website is already a (local) git repository, add git switch -c pages before the two lines shown (and, if you like, get rid of your other branch which is probably called main). Remember that the last thing you do is git push -u origin pages, which will connect the local branch pages that you just created with the remote branch of the same name on Codeberg.
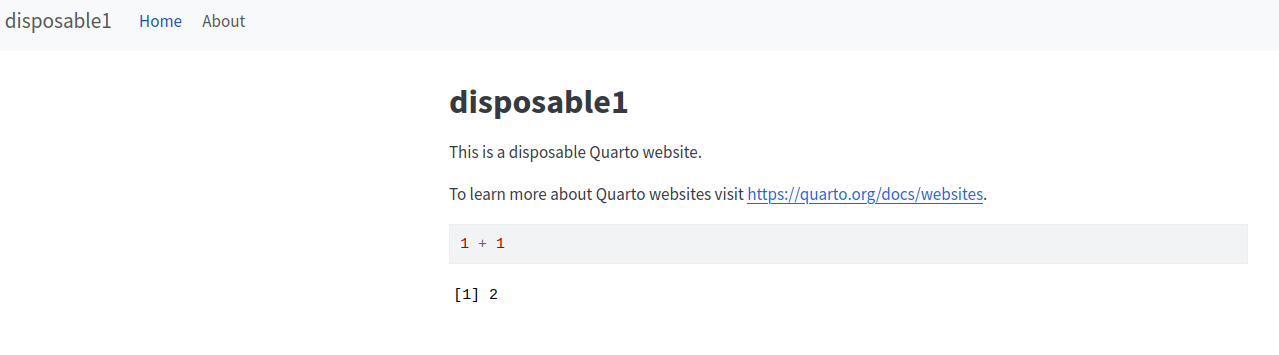
So now I have a local project, which I called disposable1, with (more or less) the template website in it, which I rendered, and then the whole thing was pushed to Codeberg.
The final step is to use Codeberg pages to share the website with the world. The documentation for Codeberg Pages is here. The key URL format is this one: https://username.codeberg.page/reponame/, so now I should be able to point my browser at https://nxskok.codeberg.page/disposable/, and this is what I see:
There are no special Settings requirements for this: any Codeberg repository with a pages branch and an index.html file in the root directory can be accessed in this way.
Website and source in different places
The approach described above works2 for most of my websites, but when I came to reorganize my blog as a Quarto blog website, it didn’t seem to like having the content and the html files in the same place. This is possibly because a Quarto blog has a structure that expects certain files to be in certain places, and it doesn’t like you tinkering with it. When you render a blog, or any other Quarto website that does not have an output-dir: line in _quarto.yml, the rendered site ends up in its entirety in a folder _site below the root of your R Studio project.
You’ll remember that for Codeberg Pages to work, the website has to be in the root folder of the repo, and now it is not. So we need a different solution. The simplest one I could come up with is to maintain two repos, one with the source code and the website in the _site folder, and the other with just the contents of the _site folder, with an index.html at the root.
Using my blog as an example, the two repos are called blog1 with the source .qmd files, and blog with the rendered website.
blog1 is a Quarto website project, in the same way that disposable1 was. This, however, is not going to be shared with the world, so you can work on the main branch as usual, and it could be a private repo or not on Codeberg (I keep blog1 on worktree.ca). Create this repo wherever you are going to keep it, and follow the instructions to connect it to your local repo, as written (with the main branch). The other thing to say about this is that the _site folder that will be created each time you render your website does not need to be under version control (it can always be rebuilt), so the _site folder should be in .gitignore for this repository.
The local version of the second repository should be a subfolder in the same containing folder that blog1 is a subfolder of. (I have a folder called r-projects that all my R projects live in, so that both blog1 and blog are subfolders of r-projects.) This is not an R project of any sort, so we will use the command line to work with it. I will be using bash; adjust as necessary to your setup. To start with, blog should be an empty folder.
Then fire up a command line (terminal), and put yourself in the blog folder. (As a check, ls should return no files.) Make sure that you rendered the website blog1, so that blog1 has a subfolder called _site. Then copy the files in _site into blog, like this:
cp -R ../blog1/_site/* .The -R recursively copies any subfolders of _site. The * on the end of the copy command is important; if you omit this, blog will contain a subfolder called _site, with the website below that, and this is not what you want. To check that it worked, run ls now, and you should see a file called index.html, along with some other files and possibly subfolders. (If it’s a blog, you’ll also see about.html and a subfolder called posts.)
The contents of blog now need to be put under version control, in a branch called pages, something like this:
git init
git switch -c pages
git add .
git commit -m "first commit"
The advantage to running git switch first is that no other branches get created, not even main.
Next, we connect a new Codeberg repo with this one. In Codeberg, create a new repo (mine has the same name blog as the local one), and follow the instructions for pushing an existing repository, remembering to use the pages branch on both ends, something like this:
git remote add origin ssh://git@codeberg.org/username/blog.git
git push -u origin pages
Now, you can check out the current state of your website at https://username.codeberg.page/reponame/, substituting your username (mine is nxskok) and repo name (blog).
From here on, the workflow is this:
- add some content to your website, in
blog1 - run
quarto renderto render the site (creating a new version of_siteinsideblog1) - go to your terminal and run the
cpcommand (above) to copy the new version of your website intoblog - also run the
gitcommands to push the new version of your website to Codeberg - see how the new version of the published website looks
- rinse and repeat. (From time to time, also commit the source project
blog1.)
I found it useful to create a shell script to do the copying and the git commands, since they are the same every time. Mine is called copy.sh. It lives in blog and looks like this:
cp -R ../blog1/_site/* .
git add .
git commit -m "update site"
git push
This way, I only need to run sh copy.sh to copy the new version of the website into blog and send it to Codeberg. My commit messages are very uninformative, but that hasn’t tripped me up yet.
Looking ahead
In part 2, I talk about using your own domain with Codeberg.